
Switching from WordPress to Squarespace can help you resolve any problems you’re having on your WordPress website. In this article, we will dive into how to migrate WordPress to Squarespace and show you step by step how to move from WordPress to Squarespace with details without losing your data, damage your links and seo and show you how to redsign your site to match your wordpress website and how to contect domaine with squearspace.
Whether you have small or large website, a blog, a business website, a portfolio, or an online store, this article is for you. I will explain in detail start with how to do a backup and export your WordPress website to activate your new one on Squarespace.
First, let’s examine who should and should not move form WordPress to Squarespace.

Who should and shouldn’t move from WordPress to Squarespace?
If you are someone who is already experienced with websites and you know exactly your purpose, I recommend going further to move your website.
The biggest problem that makes people move from WordPress to Squarespace is the difficulty of optimizing their websites on WordPress due to the time-consuming work involved in choosing and setting up the right plugins, themes, and other features like hosting, SEO, speed, integrations, and so on. If you are not that kind of person and you want something simple all in one place to manage, I recommend moving from WordPress to Squarespace it is for you.
On the other hand, WordPress gives you all control of your site and unlimited features to build your website, so if your business needs advanced functionalities, maybe staying on WordPress is the best option for you.
If website performance is the only reason that makes you want to move from WordPress to Squarespace, this can be solved, and the issue of this may come from your hosting server, used theme, plugins, large content, or your website not being optimized for speed. If you fix all that and the website performance is still low, it is better to convert wordpress to Squarespace.
According to HTTP Archive data for the United States origins shows that the percentage of good core web vitals for WordPress is 57%, and for Squarespace is 76%. Therefore, while Squarespace provides a more streamlined approach with generally better out-of-the-box performance, WordPress’s performance largely depends on how well the site is built and maintained.
The other thing to take into consideration before moving WordPress to Squarespace is SEO. Both WordPress and Squarespace offer all the requirements to optimize your website SEO, but WordPress offers more choices and greater freedom that you can use to improve your website SEO also Squarespace gives you the ability to handle all website SEO in one place.
The last thing I want to mention in this part moving from WordPress to Squarespace. It may affect your SEO and your links if the migration process goes wrong. That is what we will dive into in this article step by step to make your WordPress to Squarespace migration successful.
Preparation to do before migrate WordPress to Squarespace
Convert WordPress to Squarespace, including 2 things: Converting your content, which includes your pages, posts, and media through importing WordPress to Squarespace, which there are things we can import automatically and manually. We will dive into that.
The second thing we should convert is transfer or conetct your domain to squarespace this step is important in the WordPress to squerspace migration process we need to make sure everything is convert succefuly.
WordPress and sequearspace are different cms platforms each one has it own functionalities and there some content that we can not import to squerspace automatically or permanently like third party plugins, themes, customer codes, and some media file. After importing wordpress to squersapce your website design will not be look like the main one you need to do some optimization and redesign. we will see how to do that in the part of Redsign squerspace website.
What to do before moving from WordPress to Squarespace:
Before start converting WordPress to Squarespace is better to optimize your current URLs for better SEO optimization. Decide which content you want to keep and remove. This includes pages, blogs, and products if your website is an online store.
If you have a more complex website, you can use Google Analytics or Google Search Console to export all your page URLs and keep them for reference. You will need to check them once you’ve completed the migration.
Start by creating a spreadsheet or any application you find useful in each column title, including the next informaition, and fill them I recommend using your analytics tool for that to get the latest data.
- The page or post title
- Url
- Meta description
- Focus keywords are used for SEO
- Traffic
- Rank position
SpreadSheet Example:

That will help you do URL redirection and optimize your SEO. We will dive into that in the part of how to do URL redirections and optimze your Squarespace website SEO.
Before diving into the first step of the migration, make sure to update your current WordPress version and your theme and plugins and remove all unwanted content for an easy migration process, and you do not want to handle that while you redesign your website. Let’s now start with the first step to migrate WordPress to Squarespace. Make sure to complete reading and practice at the same time for a successful website migration.
Migrate WordPress to Squarespace In just a few steps with details
Step 1: WordPress website backup and export content from WordPress
Before exporting your content from WordPress, you need to do a website backup to ensure that you save a version of your website. If something unexpected happens during the migration process, you will have a backup for your website.
The best option to do a website backup on WordPress is by using plugins I recommend, such as UpdraftPlus or All-in-One WP Migration and Backup. In this guide, we will explain how to do a WordPress website backup using All-in-One WP Migration and Backup. And the same step applies to all website backup plugins.
To install the All-in-One WP Migration and Backup plugin on the left sidebar from the WordPress dashboard, go to plugins and click on Add New Plugin. Search for All-in-One WP Migration and Backup. Click on install and activate:

To create a backup on the left sidebar, hover over All-in-One WP Migration and Backup and click on Backup. Then click on caret a backup. It will take some time to finish backing up your website. After finishing, don’t forget to download your backup and make sure to save it.

There is another option, which you can do manually, but it is a little bit advanced, and you should have some website management skills to do it. Correctly, you can search for a tutorial on YouTube about that. However, using a WordPress website backup plugin is still the best option for small to medium websites.
After backing up your website, the next thing you will do in this step is export your WordPress content. Once you want to migrate WordPress to Squarespace, you need to export all content.
After backing up your website, the next thing you will do in this step is export your WordPress content. Once you want to migrate WordPress to Squarespace, you need to export all content.
From your WordPress dashboard on the left sidebar, click on Tools and choose Export. Click on export all content and download. The file name will come like this: websitename.wordpress.dateofexport, which is the file that you will import to Squarespace’s new website, but before that, let’s see in the next step how to create a Squarespace website.


Step 2: Create Squarespace Website
Before you import WordPress to Squarespace site, you need to create a Squarespace website. If you already have a website on Squarespace, jump directly to step 3, How to Import WordPress to Squarespace.
Squarespace offers a 14-day free trial, which allows you to use the platform without any cost to start creating your website. After that, you have to purchase one of the Squarespace plans to keep using the platform and keep your site alive. I recommend finishing the migration process and testing your website, then purchasing the plan that you find fitting your site requirements..
To create a Squarespace website, enter Squarespace and click on Get Started.

In the next step, Squarespace offers 2 options that you can choose from to start creating your website: either using one of Squarespace’s professional templates or creating one with AI. You are free to choose whatever you find best for your choices. I recommend choosing a Squarespace template that fits your website design look.

As in this example, I am choosing this template because it fits my website needs. It is better to do your research before choosing any template.

After choosing your templates, you will end up in the Squarespace dashboard, where you can see your new website, all its content, and settings. We are not done yet because we have to redesign everything to make sure that our website looks the same as the previous one or even better. Before this step, we need to import our content from WordPress to Squarespace. That is what we will see in the next step. import WordPress to Squarespace

Step 3: How To import WordPress to Squarespace
Before I explain how to import WordPress to Squarespace, there are things that you can import automatically and things you can’t. Let’s start with the content that you can import:
The content that you can import includes blog posts, pages, some images, and basic SEO data. Make sure that importing WordPress to Squarespace will not make your website as it is on WordPress; you need to redesign it.
To import wordpress to squersapce on your dashboard click on settings

Choose the import & export content section

Click on Import and choose wordpress


There are 2 options to import WordPress to Squarespace: Basic and Advanced. Once you export your content from WordPress, you have to choose the advanced option to make sure that all your content from the WordPress website is transferred to Squarespace correctly.
Click on Add File and select the file that you exported from WordPress. Click on “Begin Import.” It will take a few minutes to import all the content on your Squarespace website successfully.

Importing it will take a few minutes to finish for sure. Your website will look different and messy; it needs maintenance and rebuilding. We will dive into that in the next step. Now let’s see how you can handle the content that you cannot transfer automatically from WordPress to Squarespace.
Here are some elmenets that do not tranfer automatically and need to be handle manually:
Content from Plugins (Forms, Widgets, Custom Features…)
Since Squarespace doesn’t support WordPress plugins, you need to rebuild these features using Squarespace’s built-in tools for example:
Forms: Use Squarespace’s Form Block (under “Add Block” → “Form”)
Custom Widgets: Try using Code Blocks to manually add missing functionality.
Third-party integrations: If you used plugins for marketing or analytics, check Squarespace Extensions for alternatives.
Themes & Design
Your WordPress design won’t transfer, so you need to customize a Squarespace template. For that, as I said, choose a template close to your old site’s style. Recreate your homepage, menus, and layouts using Sections & Blocks. Adjust fonts, colors, and spacing. We will dive into some basics of that in the part of redesigning your website.
Gallery Images & Media Library
WordPress media files that are not used on any of your pages or posts aren’t imported automatically; you must download all images from the WordPress Media Library and re-upload them in Squarespace using Image Blocks or Gallery Blocks.
Custom Post Types & Shortcodes
Custom post types (like testimonials and portfolios) and WordPress shortcodes don’t work in Squarespace; you need Rebuild custom post types using Squarespace’s Blog or Summary Blocks. Replace shortcodes manually (for example, instead of [button], add a Button Block), and if shortcodes appear as plain text, delete or replace them with Squarespace features.
WooCommerce to Squarespace Commerce
If you are using WooCommerce your products won’t transfer automatically you must Export products from WordPress (WooCommerce → Products → Export CSV) and Import them into Squarespace via Commerce → Inventory → Import → CSV Upload. Manually set up product variations, images, and pricing in Squarespace Commerce.
Membership Sites
If you had a membership site, Squarespace won’t migrate accounts. Manually set up membership pages using Squarespace Member Areas, Recreate user access levels and invite members via email
and Consider using third-party integrations for advanced memberships.
By following these steps, you will be able to import WordPress to Squarespace while ensuring no essential elements are lost in the transition. Now it’s time to design your website and maintain your website structure and content. That’s what we will dive into in the next step: how to design your website for the best look.
Step 3: Redesign your website for a better look
After finishing importing WordPress to Squarespace, you need to optimize and redesign your website on Squarespace. I recommend that if you are a newbie, you try to watch some tutorials on YouTube about how to create a Squarespace website that will help you more practically to rebuild your website or hire a professional website designer that can do the work for you without wasting your time.
Now you need to enter to your website pages from the dashboard; click on pages in the left sidebar.

Your imported content will look like this: The pages above are for the Squarespace template, and the ones that are below are for the content that you will import from WordPress. If your imported content does not show, just refresh the page. You should remove all the pages that are not from the imported content. Hover on the page that you want to remove and click on the gear icon that will appear beside the page title. A popup will show; scroll down and click on Delete Page.

After removing the Squarespace template pages, you need to enable the imported one to know that a page is disabled; it will show in the gray color, and to enable any page, hover over it and click the gear icon beside the page title.

From the popup that will show, scroll down and click on Enable Page and save now the page is alive. The next thing you need to do is edit your pages and redesign them.

To edit a page, click on edit. Squarespace is one of the easiest website page builders. It is simple to use with a drag-and-drop editor; you can edit any section on your page easily.

To make a change on any page, select the section that you want to edit and click on Edit Section, then start optimizing as you want. As I said before, if you are a beginner with Squarespace, I recommend watching a tutorial about it, or if you need any help, just contact me. I would be happy to help you design your website. Let’s now see how to edit your Squarespace website title and logo.

To edit your Squarespace website title and logo, click on any page from the dashboard sidebar, click on edit > edit site header, and click on edit site title & logo.


From the menu that shows, enter your title and upload your website logo. If you scroll below the menu, Squarespace allows you to add different logos for mobile. Read more about how to add a logo to a Squarespace site with details.

We are not done yet with redesigning your website. Let’s take a look at how to change the Squarespace website color and fonts.
Back to your Squarespace dashboard and click on styles in the left sidebar. From there, you can change anything you want for your website style, like themes, colors, buttons, and fonts. Just click on any section you want to change and start making changes to the settings of that section. After you are done, click save in the top corner.

I mention here just some basic designs you can do to redesign your website. The best practice you can do is check one of the full Squarespace tutorials on YouTube and follow them step by step. I am sure you will end with good redesign results.
In the next step, we will talk about URL redirects and SEO optimization, which are two of the necessary things you need to do in this WordPress to Squarespace migration. You don’t want to lose any traffic and let any page or post be not found. We will dive into this in the next step to make your move from WordPress to Squarespace successful.
Step 4: Squarespace URL 301 redirection and SEO optimization
Squarespace and WordPress have different URL structures. After you import your content from WordPress to Squarespace, you need to make changes to the page URLs.
For example, if your about page URL is yourdomain.com/about, it should be the same URL in your about page on Squarespace.
In the blog posts, it is different on Squarespace; every blog post URL should be like in this strecture: yourdomain.com/blog/the-blog-post-title
If you use the example of the Excel sheet that I explain above in the preparation steps, it will make you do those changes fast and easy, so make sure to do it because you will not only change your URLs but optimze your pages and posts titles and meta descriptions.
To change a Squarespace page URL and title from your dashboard, click on Pages, then click on the gear icon beside your chosen page from the menu that pops up as in the image below. You can make all the changes that you prefer on your page title, navigational title, and slug title, which is your page URL, like yourdomain.com/blog. Once you finish changing, click on save in the corner.

URLs Redirection:
Migrate WordPress to Squarespace; it will affect your URLs. To solve this, you need to do a URL redirect that helps forward visitors away from inactive or deleted pages to active ones, ensuring they get the page that they are looking for.
For this we will use the 301 redirects which will conert the inactive URL to the active ones as well as make the search engine know your active urls and index them.
To create a 301 redirect, go to your Squarespace dashboard, click on the settings icon on the left sidebar, choose Developer Tools (the last option on the settings menu), and click on URL Mapping.
On the square field, the URL 301 redirect should be in this format:
/old-url -> /new-url 301
here is an example of the URL that I will use old URL /how-to-make-pizza-2024 – new URL /how-to-make-pizza-2025
My 301 redirect format it will be like this:
My 301 redirect format it will be like this:
/how-to-make-pizza-2024 -> /how-to-make-pizza-2025 301

This URL redirection example applies to the pages if you want to do a URL redirection for a blog post or any item on your website; each one uses a different format. I recommend you visit this article from Squarespace about URL redirection; it will help you set up your URL mapping.
Title and Meta description optimizaition
Let’s start with how to update your SEO details on the home page. From your Squarespace dashboard, click on Settings > Marketing > SEO Appearance. In the search appearance, choose Home and your site title; it will be the title of the website that you change from the header. below You can put your meat description on the home page and click save.

For other pages like the blog, about, or contact page to edit the SEO title and meta description, choose pages from the sidebar in the dashboard, click on the gear icon beside the page title, and choose SEO from the page settings menu. From the popup, you can make changes to your site title and meta description, and don’t forget to click on save.

To change the title and meta description for a blog post, click on your blog page, and from the sidebar, choose the post that you want to change and click on settings and choose SEO from the blog settings menu. As you did for the other pages, change your title and meta description for the keyword that you work on to optimze your SEO.


Don’t forget to use proper header tags (H1, H2, H3) to structure your content clearly for both users and search engines. Ensure your H1 includes the focus keyword, and use H2s and H3s to break down topics while incorporating related and long-tail keywords naturally.
Optimize images by adding alt text with relevant keywords to improve accessibility and rankings. Keep content informative, engaging, and aligned with search intent, ensuring readability and keyword variation without overstuffing.
Step 5: Transfer domain from WordPress to Squarespace
Moving your domain to Squarespace is an Indispensable step to migrate wordpress to Squarespace and can be tricky if you don’t know how. You have two options to move your domain to Squarespace: Transfer a domain or Connect it to your website. Transferring a domain to Squarespace means that you will manage the domain in Squarespace instead of the domain provider platform. You have to follow many steps to transfer your domain to Squarespace, and it takes about 15 days to complete the process. The Article Below from Squarespace shows everything about transferring your domain; it is the best resource I find to help you transefr domain from wordpress to squarespace.
Transferring a domain to a Squarespace site
Connecting your domain with Squarespace might be a good option for most people, especially if you are happy with your domain provider and it doesn’t take that long to connect your domain with Squarespace.
Connecting means redirecting the domain to your Squarespace website from your current domain provider, like GoDaddy, Namecheap, WordPress, etc., and it will work fine with Squarespace. You can follow the steps below to connect your domain.
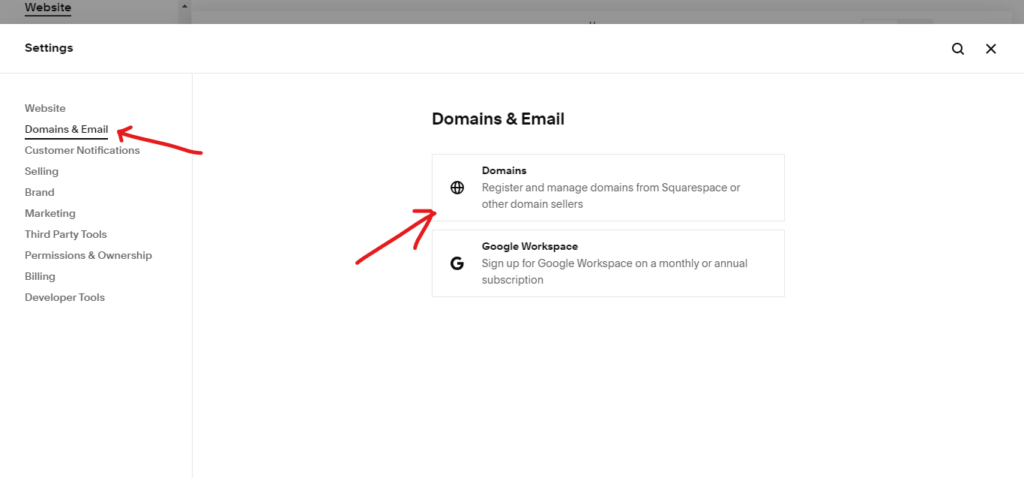
First, enter settings and click on Domains & Emails > Domains
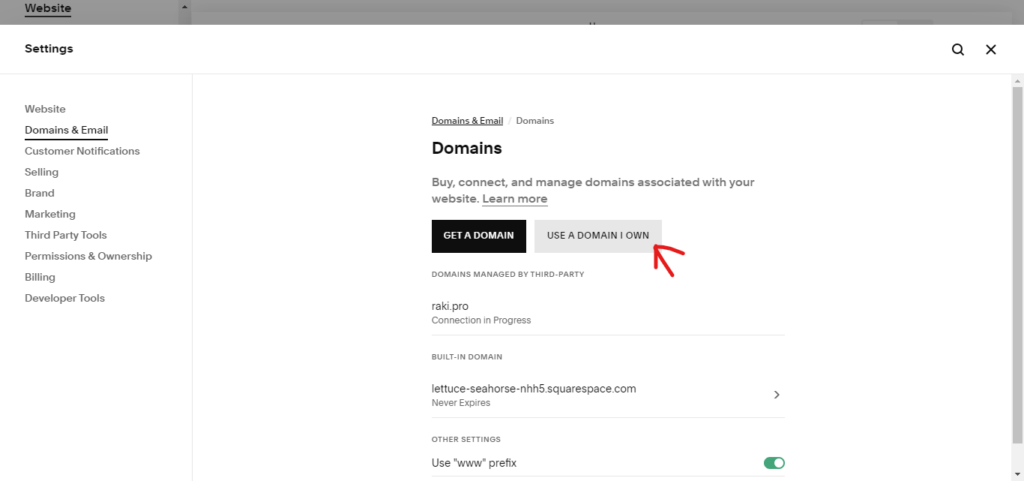
Then Click on USE A DOMAIN I OWN
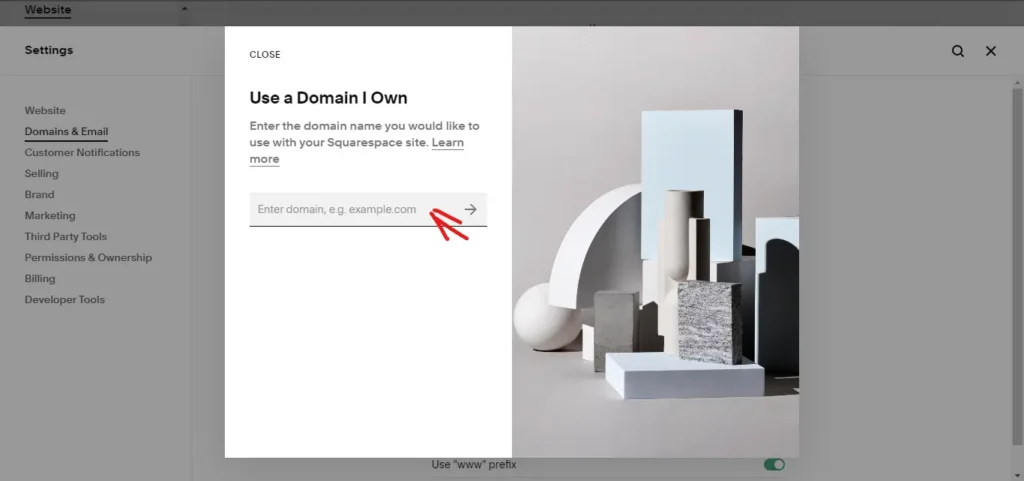
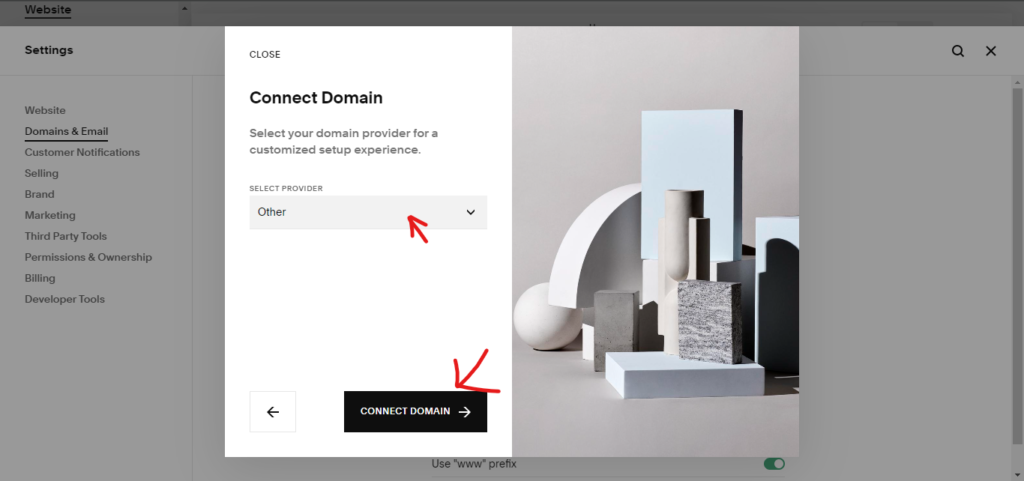
Here, enter the domain that you want to connect to your Squerspace website
As you see Squarespace gives me 2 options in the domain I entered Squarespace shows that the recommended option is to transfer the domain because it respects the platform’s requirements. Once I want to connect my domain I will choose the second option
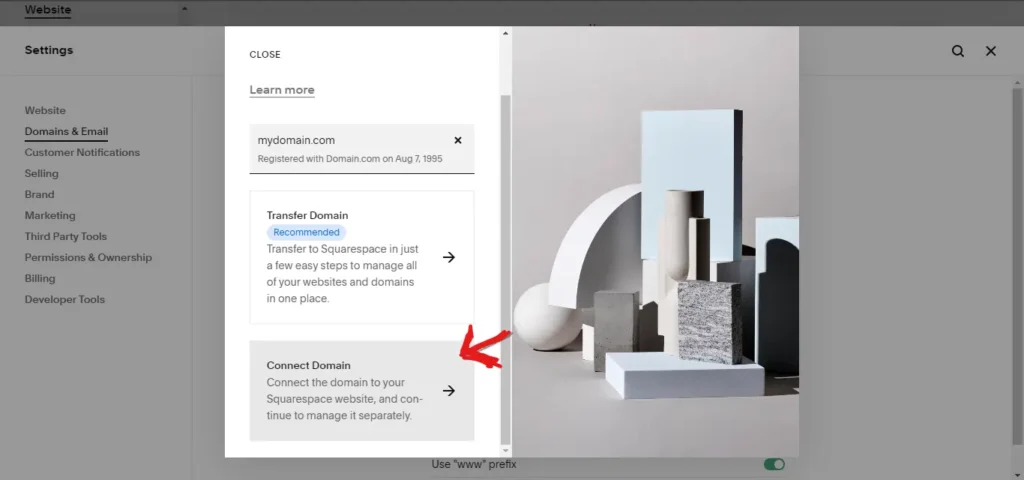
now choose your domain provider and click on Connect Domain
The last step is to manage your DNS settings. Fill in the info based on your third-party domain provider in this article from Squarespace. It explains everything you need to know about connecting your domain. Make sure to check to set up everything correctly.
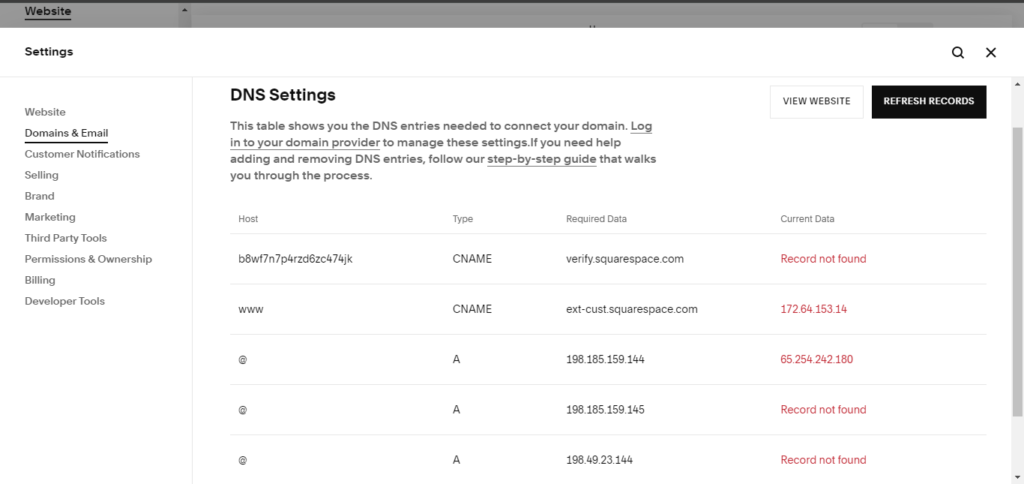
Note: Most domains connect to a site in 24 hours, but it can sometimes take up to 72 hours.
Bonus step—test your website before going live:
That’s all about how to convert WordPress to Squarespace. I hope this WordPress to Squarespace migration helps you, and I am sure you will handle everything by yourself. If not, or if you find any part hard, visit my migration website for Squarespace service, and I would be happy to help you. You will get a free consultation, and I will guide you if moving from WordPress to Squarespace is right for you, and you will get a huge discount on the service. Check it now:
Before making your Squarespace website live, it’s essential to test everything to ensure a smooth user experience and SEO performance. Let’s dive into the things that you need to check before publishing your website:
1. Double-check your pages and links to see if all are set up correctly. Check if there are any broken links; you can use an online broken link checker or manually review all links.
2. Verify Forms Test contact forms to confirm they are sending submissions correctly. If using Squarespace’s built-in form block, ensure form submissions go to the right email or connected service.
3. Before lunch, make sure your website is mobile responsive. Check your website on different mobile versions and tablets and see if it is responsive. If there are any changes that you need to make, click on the website from the left sidebar, choose style, and make sure you select the mobile version in the corner above the page style.
4. Set Up Google Analytics. It is an important step if you want to trace your traffic and know how your website performs, and don’t forget to index your website on Google Search Console and Bing. Submit your new Squarespace sitemap.xml under Search Console and Sitemaps.
NOW, Your website is ready to go again. If you do not understand something about how to migrate WordPress to Squarespace, feel free to contact me. I will help you.
FAQs
Can I move my WordPress to Squarespace?
Yes, you can move your WordPress site to Squarespace, but the process involves transferring your content, not the design. Since WordPress and Squarespace are fundamentally different platforms, your website’s appearance will not carry over automatically. Instead, you’ll need to use Squarespace’s tools to recreate your design.
Key elements like pages, posts, and media can be imported, but features dependent on plugins or custom code may not be supported. It’s important to remember that this migration focuses on transferring content, while the design will need to be rebuilt within Squarespace’s framework.
Should i switch from wordpress to Squarespace?
It depends on your goals and technical skills. Squarespace is ideal for simplicity, offering an all-in-one platform that’s easy to use, while WordPress provides more flexibility, customization, and scalability for advanced features. If you’re looking for control over every aspect of your site and don’t mind a learning curve, WordPress might be the better choice. However, if you prefer a straightforward setup with less maintenance, sticking with Squarespace could be the way to go.
Can I move my website from WordPress?
Yes, you can move your website from WordPress to another platform, such as Squarespace, Wix, or Shopify. The process typically involves exporting your content (like pages, posts, and media) and importing it into the new platform.
However, keep in mind that your design, custom plugins, and certain features may not transfer directly due to differences in how platforms work. You’ll likely need to rebuild your site’s appearance and functionality using the tools available on the new platform.
Do I Own My Website on Squarespace?
Yes and no. While you own the content you create on Squarespace (like text, images, and videos), the platform itself owns the tools, templates, and underlying infrastructure. This means you don’t have full control over the technical aspects of your website, such as hosting or source code, and your site must operate within Squarespace’s ecosystem.
Should I use Fiverr to migrate my website to Squarespace or try to do it myself?
If you’re looking to migrate WordPress to Squarespace and don’t feel confident handling the process yourself, using Fiverr can be a great option. You’ll find professionals who specialize in Fiverr migrate website to Squarespace services, ensuring a smooth transition without losing content, SEO value, or design quality. However, if your website is simple and you’re comfortable with technical tasks, you can follow our step-by-step guide to complete the migration yourself.
